مهندسی تکنولوژی جوشکاری

دانشگاه انقلاب اسلامی پسران شماره یک

آموزش و مشاوره در خصوص چگونگی طراحی و تدوین موضوع پایان نامه و نحوه نوشتن پروپوزال یا همان سند نحوه تهیه و اجرای پایان نامه در قالب مشخص را می توانید به آدرس ایمیل بنده در سایت اطلاع و درمیان بگذارید. و با پرداخت مبلغ توافقی صفر تا 100 پروژه کاردانی و کارشناسی خود را تحت عنوان گزارش کارآموزی و پایان نامه به بهترین نحو و با بالا ترین کیفیت طراحی،تهیه و تالیف نمائید.قطعاً آموزش صحیح و معتبر در خصوص نحوه نگارش و تالیف پایان نامه و گزارش میدانی و علمی و عملی صحیح در مرکز مناسب و مرتبط با رشته تحصیلی خود خواهید توانست پایان نامه و گزارش یا کارآموزی خود را به یکی از خاص ترین، پرمحتوا ترین و باکیفیت ترین پایان نامه ها و یا گزارش کارآموزی در بین همکلاسی های خود داشته باشید و به آن و ارزش علمی آن افتخار کنید.


نویسنده: Ehsan_Nazari.sr ׀ تاریخ: چهار شنبه 16 مرداد 1398برچسب:پایان نامه,

Properties of Metals

  • hsan.Nazari.sr
  • Last updated: May 11, 2016


The important properties of an engineering material determine the utility of the material which influences quantitatively the response of a given material to imposed stimuli and constraints. The various engineering material properties are given as under.

  1. Physical properties
  2. Chemical properties
  3. Thermal properties
  4. Electrical properties
  5. Magnetic properties
  6. Optical properties and
  7. Mechanical properties

These properties of material are discussed as under

1. Physical Properties:

The important physical properties of the metals are density, color, size and shape (dimensions), specific gravity, porosity, luster etc. Some of them are defined as under.

1.1 Density

Density is defined as mass per unit volume. In metric system its unit is kg/mm3. Because of very less density aluminium and magnesium metals are preferred in manufacturing of aeronautic and transportation applications.

1.2 Color

Color deals with the quality of light reflected from the surface of metal.

1.3 Shape and Size

Dimensions of any metal reflect the size and shape of the material. length, width, height, depth, curvature diameter etc. determines the size. Shape specifies the rectangular, circular, spherical, cuboidal or any other section.

1.4 Specific gravity

Specific gravity of any metal is the ratio of the mass of a given volume of the metal to the mass of the same volume of water at a specified temperature.

1.5 Porosity

A material is called as porous or permeable if it has pores within it.


2. Chemical Properties:

The study of chemical properties of engineering materials is necessary because most of the materials, when they come in contact with other substances with which they can react, suffer from chemical deterioration of the surface of the metal. Some of the chemical properties of the metals are corrosion resistance, chemical composition and acidity or alkalinity. Corrosion is the gradual deterioration of the material by chemical reaction with its environment.


3. Thermal Properties:

The study of thermal properties of materials is essential in order to know the response of metal to thermal changes i.e. lowering or raising of temperature. Different thermal properties are thermal conductivity, thermal expansion, specific heat, melting point, thermal diffusivity.

3.1 Melting point:

melting point is the temperature at which a pure metal or compound changes its state from solid to liquid. Melting point is called the temperature at which the liquid and solid are in equilibrium. It can also be said as the transition point between solid and liquid phases. melting temperature depends on the nature of inter-atomic and intermolecular bonds. Therefore higher melting point is exhibited by those materials possessing stronger bonds. Covalent, ionic. metalic and molecular types of solids have decreasing order of bonding strength and melting point. Melting point of mild steel is 1500°C, of copper is 1080°C and of aluminium is 650C


4. Electrical Properties:

The various electrical properties of materials are conductivity, temperature coefficient of resistance, dielectric strength, resistivity and thermoelectricity.

4.1 Conductiviy

Conductivity is defined as the ability of the material to pass electric current through it easily i.e. the material which is conductive will provide an easy path for the flow of electricity through it.

4.2 Temperature coefficient of resistance

temperature coefficient of resistance is generally termed as to specify the variation of resistivity with temeprature.

4.3 Dielectric strength

Dielectric strength means insulating capacity of material at high voltage. A material having high dielectric strength can withstand for longer time for high voltage across it before it conducts the current through it.

4.4 Resistivity

Resistivity is the property of material by which it resists the flow of electricity through it.

4.5 Thermoelectricity

If two dissimilar metals are joined and then this junction is heated, a small voltage (in the milli-volt range) is produced and this is known as thermoelectric effect. It is the base of the thermocouple. Thermo-couples are prepared using the properties of metals.


5. Magnetic Properties:

Magnetic properties of materials arise from the spin of the electrons and the orbital motion of electrons around the atomic nuclei. In certain atoms, the opposite spins neutralize one another, but when there is an excess of electrons spinning in one direction, magnetic field is produced. Many materials except ferromagnetic material which can form permanent magnet, exhibit magnetic affects only when subjected to an external electro-magnetic field. Magnetic properties of materials specify many aspects of the structure and behavior of the matter. Various magnetic properties of materials are magnetic hysteresis, coercive force and absolute permeability which are defined as under.

5.1 Magnetic hysteresis

Hysteresis is defined as the lagging of magnetization or induction flux density behind the magnetizing force or it is that quality of a magnetic substance due to energy is dissipated in it on reversal of its magnetism. Below Curie temperature, magnetic hysteresis is the rising temperature at which the given material ceases to be ferromagnetic, or the falling temperature at which it becomes magnetic. Almost all magnetic materials exhibit the phenomenon called hysteresis.

5.2 Coercive Force

Coercive force is defined as the magnetizing force which is essential to neutralize completely the magnetism in an electromagnet after the value of the magnetizing force become zero.

5.3 Absolute permeability

Absolute permeability is defined as the ratio of the flux density in a material to the magnetizing force producing that flux density. Paramagnetic materials posses permeability greater than one whereas di-magnetic materials have permeability less than one.


6. Optical Properties:

The main optical parameters f engineering materials are refractive index, absorptivity, absorption co-efficient, reflectivity or transmissivity. Refractive index is an important optical property of metal.

6.1 Refractive index

Refractive index is defined as the ratio of velocity of light in vacuum to the velocity of a material. It can also be termed as the ratio of sine of angle of incidence to the sine of refraction.


Mechanical Properties of Metals


Often materials are subject to an external force when they are used. Mechanical Engineers calculate those forces and material scientists how materials deform or break as a function of force, time, temperature, and other conditions. Materials scientists learn about these mechanical properties by testing materials.

mechanical properties of metals

Some of the important mechanical properties of the metals are Brittleness, Creep, Ductility, Elasticity, Fatigue, Hardness, Malleability, Plasticity, Resilience, Stiffness, Toughness, Yield strength. Above mechanical properties of metals are explained below in brief.

Brittleness:

The tendency of material to fracture or fail upon the application of a relatively small amount of force, impact or shock.

Creep:

When a metal is subjected to a constant force at a high temperature below its yield point, for a prolonged period of time, it undergoes a permanent deformation.

Ductility:

Ductility is the property by which a metal can be drawn into thin wires. It is determined by percentage elongation and percentage reduction in the area of metal.

Elasticity:

Elasticity is the tendency of solid materials to return to their original shape after being deformed.

Fatigue:

Fatigue is the of material weakening or breakdown of equipment subjected to stress, especially a repeated series of stresses.

Hardness:

Hardness is the ability of material to resist permanent change of shape caused by an external force.

Malleability:

Malleability is the property by which a metal can be rolled into thin sheets.

Plasticity:

Plasticity is the property by which a metal retains its deformation permanently, when the external force applied on it is released.

Resilience:

Resilience is the ability of metal to absorb energy and resist soft and impact load.

Stiffness:

When an external force is applied on metal, it develops an internal resistance. The internal resistance developed per unit area is called stress. Stiffness is the ability of metal to resist deformation under stress.

Toughness:

When a huge external force is applied on metal, the metal will experience a fracture. Toughness is the ability of metal to resist fracture.

Yield strength:

The ability of metal to bear gradual progressive force without permanent deformation.

نویسنده: Ehsan_Nazari.sr ׀ تاریخ: چهار شنبه 16 مرداد 1398برچسب:خصوصیات و ویژگی های ماده (فلزی),

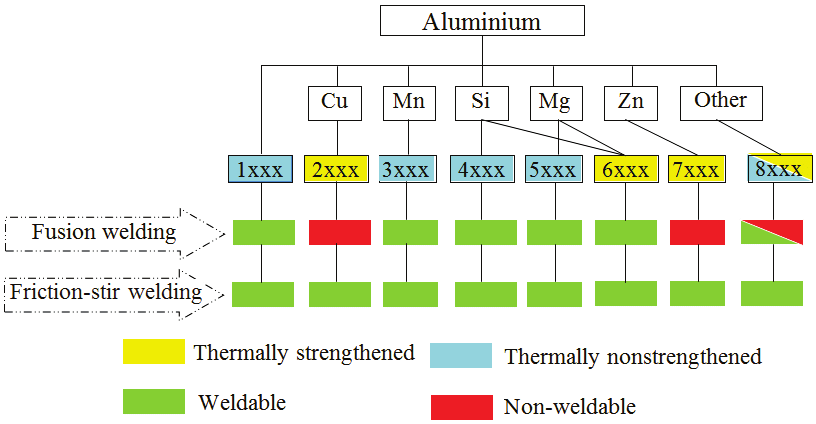
Weldability of various aluminium alloys by fusion and friction stir welding [1]

نویسنده: Ehsan_Nazari.sr ׀ تاریخ: چهار شنبه 16 مرداد 1398برچسب:جوش پذیری آلیاژ های آلومینیوم به روش ذوبی و جوشکاری اصطکاکی اغتشاشی,

Modes of Heat Transfer

  • hsan.Nazari.sr
  • Last updated: Jan 21, 2017


Different modes of heat transfer
Heat is a form of energy which transfers between bodies which are kept under thermal interactions. When a temperature difference occurs between two bodies or a body with its surroundings, heat transfer occurs.
Heat transfer occurs in three modes. Three modes of heat transfer are described below.

  1. Conduction
  2. Convection and
  3. Radiation

Conduction:

In Conduction, heat transfer takes place due to a temperature difference in a body or between bodies in thermal contact, without mixing of mass. The rate of heat transfer through conduction is governed by the Fourier’s law of heat conduction.

Q = -kA(dT/dx)

 Where, ‘Q’ is the heat flow rate by conduction
‘K’ is the thermal conductivity of body material
‘A’ is the cross-sectional area normal to direction of heat flow and
‘dT/dx’ is the temperature gradient of the section.


conduction, convection and radiation are the three modes of Heat transfer

Convection:

In convection, heat is transferred to a moving fluid at the surface over which it flows by combined molecular diffusion and bulk flow. Convection involves conduction and fluid flow. The rate of convective heat transfer is governed by the Newton’s law of cooling.

Q = hA(Ts-T)

 Where ‘Ts‘ is the surface temperature
‘T‘ is the outside temperature
‘h’ is the coefficient of convection.


Radiation:

In radiation, heat is transferred in the form of radiant energy or wave motion from one body to another body. No medium for radiation to occur. The rate of heat radiation that can be emitted by a surface at a thermodynamic temperature is based on Stefan-Boltzmann law.

Q = σ.T4

 Where ‘T’ is the absolute temperature of surface
‘σ’ is the Stefan-Boltzmann constant.
نویسنده: Ehsan_Nazari.sr ׀ تاریخ: چهار شنبه 16 مرداد 1398برچسب:Modes of Heat Transfer,

Welding Symbols According to IS: 813 – 1991

  • hsan.Nazari.sr
  • Last updated: Nov 24, 2015


Basic Weld Symbols

The basic weld symbols according to IS: 813 – 1961 (reaffirmed 1991) are shown below with sectional representation and symbol in the tabular form for different forms of weld.

Fillet, square butt, single-V butt, double-V butt, single-U butt, double-U butt, single bevel butt, double bevel butt, single bevel butt, double bevel butt, Single-J butt, Bead, Stud, sealing run, spot, seam, mashed seam, plug, backing strip,  stitch, projection, flash, butt resistance or pressure are the different form of welds.
Basic weld symbols
Basic Welding Symbols

Supplementary Weld Symbols:

In addition to the above basic weld symbols, some supplementary symbols according to IS: 813 – 1961 (reaffirmed 1991) are shown below with drawing representation and symbol in the tabular form.

Weld all round, field weld, flush contour, convex contour, concave contour, grinding finish, machining finish and chipping finish are the different particulars of supplementary weld symbols.
Supplementary weld symbols

Elements of a Welding Symbol

A welding symbol consists of the following eight elements:

  1. Reference line,
  2. Arrow,
  3. Basic weld symbols,
  4. Dimensions and other data,
  5. Supplementary symbols,
  6. Finish symbols
  7. Tail, and
  8. Specification, process or other references.

Standard Location of Welding Symbols

According to Indian Standards, IS: 813 – 1961 (Reaffirmed 1991), the elements of a welding symbol shall have standard locations with respect to each other. The arrow points to the location of weld, the basic symbols with dimensions are located on one or both sides of reference line. The specification if any is placed in the tail of arrow. Below image shows the standard locations of welding symbols represented on drawing.

Standard location of welding symbols

Standard location of welding symbols

Some of the examples of desired welding symbols:

  1. Fillet-weld each side of tee-convex contour,
  2. Single V-butt weld machining finish
  3. Double V-butt weld
  4. Plug weld – 30 groove angle-flush contour and
  5. Staggered intermittent fillet welds

The above 5 desired weld symbols drawings are shown below in tabular form.
representation of weld symbols

نویسنده: Ehsan_Nazari.sr ׀ تاریخ: چهار شنبه 16 مرداد 1398برچسب:Welding Symbols According to IS: 813 – 1991,

Defects in Welding Joints: Internal and External

  • hsan.Nazari.sr
  • Last updated: Sep 12, 2016


Defects in welding joints can be classified into two types as external and internal defects.

External Defects in Welding
Internal Defects in Welding
 Internal Defects

1. External Defects in welding:

External defects of welding include overlap, undercut, spatter, crater, excessive convexity, excessive concavity, surface porosity, surface cracks.

1.1 Overlap:

Overlap defect in welding
Reasons:

  • Magnetic arc  blow.
  • Excessive size of electrodes.
  • Use old small welding speeds during joining of small thickness plates.
  • Excessive current conditions.

1.2 Undercut

undercut defect in welding
Undercut area appears like a small notch in the weld interface.
Reasons:

  • Use of magnetic arc blows with direct current straight polarity.
  • Undersize electrode and insufficient current conditions etc.
  • Use of high welding speeds during joining of large thickness plates.
  • Excessive arc length.
  • Excessive side manipulation.
  • Use of damp electrodes.

1.3 Spatter:

During welding operation due to the force of arc, some of the molten metal particles are jumping from weld pool and falling into other areas of the plate is called as spatter.
spatter in welding
Reasons:

  • Use of low welding speeds during joining of large thickness plates.
  • Excessive arc length.
  • Use of sample electrodes.

1.4 Crater:

  • At the end of welding in Gas Welding, a shallow spherical depression is produced known as the crater.
  • crater -This is due to improper welding technique and is formed at the end of weld run.
  • This may be remedied by proper manipulation of the electrode. when finishing a weld the operator should not draw away the arc quickly but should maintain the arc without moment until the crater is filled up.
  • On re-striking the arc, to continue the weld bead, the arc should strike approximately 15mm in front of the previous bead and travel backwards and then forward the direction of welding.

Reason:

Incorrect torch angle or use of large angle at the end of the weld bead.

1.5 Excessive Convexity:

Reasons:

  • Use of low welding speed with direct current reverse polarity.
  • excessive current conditions.
  • Use of large size electrodes for joining of small thickness plates.

1.6 Surface Porosity:

  • Porosity is a group of small voids whereas blow holes or gas pockets are comparatively bigger isolated holes are cavities.
  • They occur mainly due to entrapped gases.
  • The parent metal melted under the arc tends to absorb gases like H2, CO, N2 and O2 from the atmosphere.
  • These gases may also be produced due to coating gradients in the electrode (or) moisture, oil, grease etc., on the base metal. The causes may be summarised as
    • Improper coating of an electrode.
    • Longer arc.
    • High welding currents.
    • Incorrect welding techniques.
    • Electrodes with a damp coating.
    • Rust, oil, grease etc on the job.
  • High Sulphur and carbon contents in the base metal.

1.7 Surface Cracks:

Cracks (both external and internal):

  • Cracks may be on the microscopic or macroscopic scale.
  • They may appear in the base metal, base metal – weld metal boundary or in the weld metal. The crack may be on the weld surface or inside causes are
  • The rigidity of the joint (the members are not free to expand or contract).
  • Poor ductility of the base metal.
  • High sulphur and carbon content of these metal.
  • Electrode with the H2 content.
  • The presence of residual stresses.
  • Joining of high thermal expansion materials without preheating.
  • Joining of high thermal expansion materials without preheating.
  • Welding of ferrous materials by using hydrogen as a shielding gas.


2. Internal defects in welding:

Internal defects include slag inclusion, lack of fusion, necklace cracking and incomplete filled groove.

2.1 Slag Inclusion:

  • Slag is formed by reaction with the fluxes and is generally lighter.
  • It has low density. So it will float on the top of the weld pool. And would chipped off after solidification.
  • However, the stirring action of the high-intensity arc would force the slag to go into weld pool and if there is not enough time for it to float, it may get solidification inside the fusion and end up as slag inclusion.

Reasons:

  • Use of forehead welding technique in welding.
  • Incorrect select of flux powder.
  • Improper cleaning of the weld beads in multipass welding.
  • Undercut on the previous pass.
  • Incorrect manipulation of the electrode. Slag inclusion like property weakens the metal by providing the discontinuities.

2.2 Lack of fusion:

lack of fusion defect in welding

Reasons:

  1. Incorrect torch angle in gas welding
  2. Insufficient current conditions in Arc welding.
  3. Joining of high melting point and high thermal conductivity

2.3 Necklace cracking:

In the case of electron beam weld does not penetrate fully, a blind weld results. In such situations, the molten metal is unable to flow into the penetration cavity and wet the side walls of the workpieces. This will result in cracking, known as “Necklace Cracking” and has been noticed in all materials such as Ti alloys, stainless steels, nickel base alloys and carbon steels.

2.4 Incompletely filled groove:

Occurs in butt welds.
Causes for incompletely filled groove are:

  • Inadequate deposition of weld metal.
  • Use of incorrect size of the electrode.
نویسنده: Ehsan_Nazari.sr ׀ تاریخ: چهار شنبه 16 مرداد 1398برچسب:welding defect\\\'s,

Weldability: Introduction and Factor Affecting it

  • hsan.Nazari.sr
  • Last updated: Jan 12, 2017
  • The ease with which welding of a given material can be done without producing any defect is called Weldability.
  • Weldability can also be defined as the capability of metal to be welded under the fabrication conditions imposed satisfactorily on the intended surface.
  • The metal should not require expensive or complicated or extracting procedures to produce a sound joint.

Factors affecting Weldability:

Melting point, thermal conductivity, reactivity, the coefficient of thermal expansion, electrical resistance and surface condition of material are the factor that affects weldability.

  1. Melting point of metal: Materials with a medium melting point can be welded very easily.
  2. Thermal conductivity: Material with high thermal conductivity (K) are treated as difficult to weld materials.
  3. Reactivity: If the material reacts with air, water or surroundings it becomes difficult to weld.
  4. The coefficient of thermal expansion of metals: Material with high thermal expansion coefficient, it becomes difficult to weld.
  5. Electrical resistance: Higher the electrical resistance of the material, it becomes difficult because it requires a lot of heat energy.
  6. Surface condition: The material with the dirty surface it becomes difficult to weld.

From the above-mentioned factors whichever the material is influenced by a maximum number of factors, the corresponding material is treated as very difficult to weld, and whichever the material is influenced by least number of factors, the corresponding material is treated as very easy weld material.

نویسنده: Ehsan_Nazari.sr ׀ تاریخ: چهار شنبه 16 مرداد 1398برچسب:weldability factors,

welding , محفوظ شده توسط احسان نظری سرشکه
مهندسین جوش دانشگاه انقلاب اسلامی 90-95 welding.LoxBlog.Com